Friday, 16 December 2011

Remote Shutdown A Computer

Hi Friends!

Today we will learn about shutting down a remote system. This is basically used by network administrators. So the main prerequisite of this command are that you should know the computer name of the remote machine have an admin privileges on that machine.

Just one thing: Use it for fun only. Do not disturb the peace and harmony around you and do not upset anyone!

To know your privileges on remote machine, try this: Start-> Run-> \\RemoteComputerName->hit Enter. If you are able to access that system, this command will work.

To know your Computer name: Start-> Computer-> (right click) Properties-> Full computer name will give you the name of the computer.

So, knowing the remote computer and having admin privileges, let's start with the process:

Step 1: Open Command prompt (Start-> (type) cmd -> hit enter)

Step 2: Type shutdown -i (hit enter). You will receive a window as shown below

Step 3: In Computers text box, add as many computers as you want to, with just one computer name in each line.

Step 4: Select option for 'What do you want these computers to do'

Step 5: Other things are self-explanatory.

Step 6: Write comment whatever you want the user to see on the screen before shutdown/ restart. Typically this is the most interesting part as programmers use variety of messages to make the end user panic!

And it's done.

Play around with this trick till, you know your limits. Well, just keep in mind what I have written earlier under 'Just one thing'.

Leave a comment if you wish to add to the blog.


Wednesday, 14 December 2011

Manually Delete Autorun virus from Hard Disk

Hi Friends!

Following up from last post, now we are going to delete Autorun virus from infected hard disk.

To give you insight on how they creep into your system, you might be aware of autorun.inf file which comes with CD, USB, DVDs or memory sticks. This file is used to launch the starting program/executable on the removable media, starting icon or any other command. Windows checks for the existence of this file for definition of instructions to be preformed on the media. Now, as understood, this is a simple text-based configuration file, can be written by anyone. The problem comes when it's written by a cracker. It's spelling is different(can trace easily in task manager and read my last blog to delete it in first place). It can lead to making many copies of some files or  may install key logger via internet and steal all your key presses(includes your user name, password, card details!).

Here, we are going to delete autorun from hard disk:

Please be cautious as we will be making some changes in the registry. So be careful on which entries are to be  deleted.

So let's get going:

Step 1: Boot your system in Safe Mode (while booting Press F8)

Step 2: Delete the following files:

  • %WinDir%\media\arona.exe
  • autorun from all drives (say, C:\autorun.exe; refer to my last blog on how to do this)
Step 3: Open Registry Editor. Press Start + R 


and Press OK

Step 4: Delete [HKCU\Software\Microsoft\Windows\CurrentVersion\Policies\System]
                      DisableTaskMgr = 1

Step 5: Delete [HKCU\Software\Microsoft\Windows\CurrentVersion\Policies\Explorer]
                       NoFolderOptions = 1

Step 6: Delete [HKLM\SOFTWARE\Microsoft\Windows\CurrentVersion\RunOnce]
                      "Worms" = "%System%\logon.bat"

Be careful, when you perform the last 3 steps,

Now, reboot your system, your system should work fine now (in most of the cases).

Leave a comment to add something which I have missed. 

Manually Delete Virus from your Pen Drive

Hi Friends!

Many of us are afraid to open a friend's pen drive on our system as we are afraid that it might contain Virus(or other malicious files) and as our Antivirus software is not updated/ we have just formatted our system/we don't have any Antivirus software at all !!/blah blah, we request him to get the pen drive cleaned up and then plug it into our system. Phew!

Now here's a simple trick using which you can see what files are present in your disk. After that, if you feel that certain files are dangerous/unknown, Google it out, you will get the necessary information and take action accordingly.

Let's get started:

Step 1: Open Command Prompt(cmd)

Step 2: Type the name of the drive you wish to check(say F:) and press enter

Step 3: Type 'attrib -s -h -r -a' and hit enter


Step 4: Notice all files that come into picture. If you already know what they are: Cool; if you don't, search in Google about that file.

Step 5: From Google, you found out that this file might be a trojan/autorun.inf and you have to delete it.
  • Type del 'file name' (quotes are used when your file name contains spaces) and hit enter.
  • Repeat for all suspicious files. Some of them are: Ravmon.exe, ntdelect.exe, New Folder.exe, kavo.exe, svchost.exe, autorun.inf
Good job Mike! you are ready to Explore your pen drive.

Now for the technicality, let's dive into the attrib command:

attrib command is used to change the attribute( or properties) of the file. Some common attributes are: Read/ Write permissions, Archive etc

Here, we have changed the attribute of files in the drive to

      -s: turn-off the System attribute
      -h: turn-off the Hidden attribute (with +H option, hidden files will not be shown in directory listings)
      -r: So that you can Read/Write/Execute that file
      -a: turn-off Archive attribute (files with +A option are available for BACKUP and XCOPY
           commands)

Now, we are done. We know how to scan our USB, delete suspicious files, and Explore the device. So, next time don't dishearten your friend, use USBs freely!

College students sharing/transferring movies, this may help you(It helped me!).

Feel free to leave a comment if you want to add something.  

Monday, 12 December 2011

Difference between 32-bit and 64-bit Operating System: PART 2

Hi Friends!

This post is a follow up of the previous one in which we learnt about our OS fundamental: the difference between 32-bit and 64-bit OS.

In this post, let's move a step forward and learn to find out our system's capability and if we can install 64-bit OS on our system or not.

So let's get started:

Determine what version of OS your system is running:

I guess Win Vista and 7 users must be aware of this knowledge base. click on Start->(Right-click) Computer

After that, you just need to see under 'System' section, the value of your 'System type:'

(Apologies, the image is getting dimmed, but I hope it serves it purpose!)

For Win XP Users: (taken from msdn, Article ID: 827218)

  #1: View System Properties in Control Panel:
  Click Start-> Run-> (type) sysdm.cpl -> OK -> (navigate to) General tab. Your OS will be listed as      (under System):
  • 64-bit OS: Windows XP Professional x64 Edition Version 'year' (the year will vary from system to system)
  • 32-bit OS: Windows XP Professional  Version 'year' 
  #2: View System Information window:
  Click Start-> Run-> (type) winmsd.exe -> OK -> System Summary -> Item -> Processor. If value of      processor starts with
  • x86: your system is running a 32-bit OS
  • ia64 or AMD64: you have a 64-bit OS on your machine
Now comes the million dollar question: Can my system run a 64-bit Windows??

Let's try to decipher this:

Click Start -> Control Panel -> Performance Information and Tools -> Click on 'View and print detailed performance and system information'

In the 'System' section, you can find which version are you currently running under 'System type'. Under '64-bit capable', you can find if you can run a 64-bit version of Windows.

Note: If you are already running 64-bit version, then there will not be any 64-bit listing

In this posts, we learnt methods to determine, which version of Windows are we using and if out system is 64-bit capable or not.

Always try to install the correct version of software on your system. This will reduce the chances of you receiving weird errors!

Feel free to share your knowledge by leaving a comment.


Tuesday, 6 December 2011

Difference between 32-bit and 64-bit Operating System: PART 1

Hi friends!

Not long ago, a friend of mine asked me on Facebook the difference between a 32-bit and a 64-bit system. I know many of us have heard of both the terms, but not many of us are sure about what it technically means. So, lets have a deeper insight into this topic today.

The Data bus connection:
A data bus is a computer component/sub item responsible for transferring data between one sub item on motherboard to another and also between CPU to other sub items (like RAM).

32-bit vs 64-bit:
Earlier, 32-bit systems were prominent. What I mean by saying 32-bit system is that in a 32-bit system, 32-bit data can travel through the data bus at any given second and this is the size of data your system's CPU can handle on RAM.

Now comes 64-bit data bus. As implied, it is double of 32, so it means a 64-bit data bus is twice as wide as 32-bit data bus and hence can handle twice the amount of data on the RAM.

When to use what:
Well, this question can be best answered most efficiently and effectively by 'you'. For web-surfing and normal office activities, you will not notice much difference. Hence, for normal home users, 32-bit systems are great( 'great' as they also cost less!!)

But, consider this, a 32-bit system can support only up to 4GB of RAM. So in future, if it is likely that the applications you use/ work upon will require more RAM, then it's better to switch to 64-bit machine( FYI: a 64-bit machine can handle up to 128GB of RAM!!)

Note of caution:
Programs written for 64-bit have do not have backward compatibility, i.e. they cannot be run on 32-bit machines. But (except for some antivirus programs, you can add them as comments), most programs written for 32-bit run on 64-bit too.

In this posts, we learnt about one of the fundamental questions in Computer Organization. In my opinion, every computer user should have basic knowledge about his/ her system, and this one's one of those fundamentals. The follow up of this post will be how to determine what version your system is running and to find out if your system's processor is 64-bit capable or not.

Till then, play around with your OS!


Monday, 5 December 2011

Windows Control Panel Key Board Shotcuts: PART 2


Hi Friends!

Keeping my promise, here is the part 2 on keyboard short cuts:

#1: Setting up of internet Properties/ Local Area Settings , just use the folloeing shortcut
       Internet Properties      :        inetcpl.cpl (and hit Enter)

#2: While making ppts for your academics, many times you would require to copy fonts downloaded from internet into the fonts folder. Going through traditional way: Click Start-> Control Panel-> Large icons -> Fonts....  now all this is just 2 secs away (to be candid, it depends upon your typing speed)
       Fonts                         :      fonts (and hit Enter, just your typing speed)

#3: To set the appearance of your display like Resolution and Orientation, use the following
       Screen Resolution      :      desk.cpl (and hit Enter)

#4: As a true user of your system, you should be aware about all the programs which are eating up your disk space and continuously erasing the unnecessary ones. Common place where temporary files are kept is "C:\Users\UserName\AppData\Local\Temp". This is surely gonna take some time to browse between the folders. Instead try this out:
      Temporary folder        :     %temp% (and hit Enter)

#5: Last but not the least, let's focus on Sound properties. To set your sound properties, use the following shortcut
       Sound                        :     'mmsys.cpl' or 'mmsys.cpl sounds' (any one without quotes,
                                               and as usual hit Enter)

So friends, here we are, equipped with some more interesting things(this time shortcuts) about our PC. I find the 'osk' and 'inetcpl' quite useful, osk while in cyber cafe entering passwords(protection from key loggers), and 'inetcpl' to configure LAN during my college days.

Hope, you will start using keyboard more and less mouse.

Leave a comment in case you come up with some more common shortcuts.    

Windows Control Panel Key Board Shotcuts: PART 1

Hi Friends!

Today, we will see one of the most common way to impress people around us using our keyboard skills. Say for example, will it not be cool to open Network Connections with command prompt rather than by taking your mouse to task bar, right -clicking and then selecting 'Open Network and Sharing Center' and then clicking 'Change adapter settings'? So lets get started:

Here, I will enumerate the commands which you will have to type on the Run window.
To open Run, press Windows(logo) at the keyboard + R (it's not capital 'r', it's how it's printed on keyboard!)

Now let's get started:

#1: The most common use of Control Panel is to check network adapter settings
         Network properties     :     ncpa.cpl (and hit Enter)

#2: Many times your keyboard does not work and you are in dire need of keypad. Don't worry, windows      provides you with 'On-Screen Keyboard'. To open it
        On-Screen Keyboard   :     osk (and hit Enter)

       You can also go to Keyboard properties:  main.cpl keyboard (and hit Enter)

#3: Continuing on the same path, you can set your system's mouse properties
        Mouse properties        :       main.cpl (and hit Enter)

#4: System properties is one of the most common control panel tool used: to know your domain, device manager, remote desktop connection settings, system restore...
        System properties       :       sysdm.cpl (and hit Enter)

#5: Removing/ Uninstalling a program is also a very common operation.
        To navigate directly to 'Add / Remove Programs' : appwiz.cpl (and hit Enter)

I am dividing this posts into two posts. Don't worry, the next set of short cuts will be there very soon!

Tuesday, 29 November 2011

Increase Speed of your mozilla Firefox browser

Hi friends!
In this edition, I am going to tell you some simple tips to increase the performance of Mozilla Firefox. Even though IE still has 51% of the market share, I have mostly seen people going for Mozilla and Chrome. So lets understand a few tricks to boost it's performance:

# 1: In the Address bar, type 'about:config' (without the quotes, notice the colon between about and config)
            You will receive a warning, like the one below: 

Click 'I'll be careful, I promise!' ....  

# 2: Enable Pipeline:
            This is the most common method to enhance 'response time'. What we are going to do is, we are going to increase the maximum number of request Mozilla is going to make to the server, before waiting for response. To do this: 
                                         
Type 'network.http.pipelining' as shown above in the 'Filter' text-box
Change the value of 'False' to 'True' and Change the value of 'network.http.pipelining.maxrequests' to say 15. (It means 15 request will be made to the server before a response from the server is waited)
  • Right click anywhere on the window->New->Integer-> type 'nglayout.initialpaint.delay' (without the quotes) ->OK->Enter 65536->OK-> restart Firefox
  • In the filter, type 'network.http.max-connections', this variable keeps value of maximum http request that should be made at a time and can have values between 1 to 65535, change to to 512(double the number)
Caution: Some browsers does not support 'pipelining', so in this you observe a performance degradation, change to default values. Also, sending many request at a time to the server results in DoS attack, the server can block your requests

# 3: Increase the Cache:
Most of us have RAM of the order of 2GB or more. And you can utilize your RAM to store regularly browsed data into the cache. To do this, you need to right click anywhere in the window->New->Integer-> type ' browser.cache.memory.capacity' (without the quotes) ->OK->Enter 65536->OK-> restart Firefox
and it's done!

# 4: Faster Loading:
You can make your Firefox remain in a high frequency interrupt mode(if you do not touch your mouse/keyboard for 0.75 sec, it enters a low priority state), to get red of this right click anywhere in the window->New->Integer->type 'content.switch.threshold' (without the quotes) ->OK->Enter 250000->OK

These were some of the tricks to increase firefox speed. You can also use third party tools like 'toolnel.net' or  enable 'TraceMonkey' or any flash block extensions. Well, I have not tried them, so not sure..

Wish you Speedy browsing!! 

Monday, 21 November 2011

Hidden Star Wars movie using telnet

Hi Friends!

Today I am going to share a simple command prompt (referred as 'cmd' throughout the text) command 'telnet'. Well, we all know it's used for connecting to remote machines, blah blah... but in real sense, many of us have not gone beyond our textbooks and feel how telnet works. In this blog, we are going to learn to play ASCII based 'star wars' using the command prompt. (By the way, we all know cmd is CUI, Character User Interface, so it should be understood that we are going to see text only).

To begin, first make sure that 'Telnet' is ON in your system.
 For that go to Start-> Control Panel -> Programs and Features -> Turn Windows features on and off -> (Check) Telnet Client -> OK


After this you can start Telnet via cmd.

One more thing, you need to be connected to web to play around with this command. Also as the telnet server is on the web, it doesn't matter what platform are you using. It runs on Windows, MAC and Linux etc.

So, having set the background, lets get started.

Step 1: Press Start

Step 2: Type cmd. Hit enter on the small black icon which is shown.

Step 3: Type 'towel.blinkenlights.nl' (without quotes, and hit enter)

                                                       
Step 4: There is actually no step 4!, just connection to the internet would suffice. Your cmd prompt will establish connection and the next screen would be as shown below


The next screen which would prompt will be as shown below: 


There you are, ready to enjoy movie on a text interface and thinking why on Earth did we need that.
Well, if you come up with a genuine reason, do post it.

Till then
adiós                                 


Wednesday, 16 November 2011

Windows 7 Genuineness Extension For Free

Hi friends!
In this post I am going to share about a simple command which will extend your Windows 7(Home, Enterprise or Ultimate) to 120 days more than its trial period, which is generally 30 days. In this manner, you will be getting regular Windows updates while you are still deciding if this is the OS you want to go with.
So let's get started:
Step 1: Click on Start button
Step 2: Type 'cmd' (without single quotes)
Step 3: Right click on the command prompt icon (Under Program section). Select 'Run as administrator '
Step 4: Write 'slmgr -rearm' (notice the space  between 'r' and hyphen, and write without single quotes)
Step 5: It will ask you to 'Restart' your system. Restart your system
and Tan-Tadaan, now you have genuine Windows in your laptop.

Well to give you more insight, we have used Windows 'Software License Manager' (for slmgr), a utility which is shipped along with your Win OS and ran it using Administrator credentials to activate your Windows for 120 more days.

But remember once your 120 days are over, this trick will not work, means it's a one time tool. After this period you will have to feed your OS with activation key. So do keep this point in mind.


Till then, enjoy your PC. :Þ

Monday, 14 November 2011

VLC Player Trick

Hi guys!
Here I am back again with another.. well it's not basically a trick or hack.. but exploration of VLC media player. In this blog, I will show you how can you make VLC player capture your screen and run into an infinite loop. So let's get started (screen shots are provided for easy demonstration)

Step 1: Open VLC player
Step 2: Press CTRL + N. Hit return
            You will see a window like this:

 Step 3: Type 'screen://' (without single quotes) in the address field
                
Step 4: Press the 'Play' button at the bottom this window and see what happens
VLC will capture your screen and it will keep shrinking it. 

FYI: I am still looking for the keyboard short cut to stop this loop, but till now no Luck!! So click on the close button at the top right corner of VLC window to get rid of it.

If you get any, please post it as a comment.

Yours Truly,


Sunday, 13 November 2011

Flaws In Windows

Hi! I have been using Windows for a decade now and in the next few lines, I m gonna share with you one of the simplest and oldest of flaws.
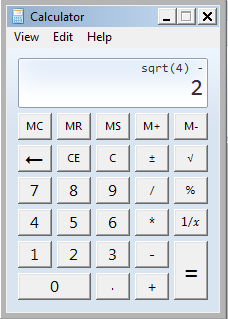
Press Windows+R to prompt Run, type 'calc' (without single quotes), Windows calculator will open up in front of you. Now here's where we are going to have fun. I will enumerate the steps for clear understanding:
Step 1: Press 4(any integer whose square root is also an integer will do the trick)
Step 2: Press Square root button
Step 3: Press - (minus button)
Step 4: Press 2( for any other number, press its positive square root i.e don't press '-' button again, you will miss the fun)
Step 5: Press = (equal to button)

Now, you got to see some creepy number instead of our dear friend '0' (for Indians invented it).


Try it out with as many numbers as you wish, the answer will always be wierd.