Thursday, 14 April 2016

Export or backup Outlook .pst file: All MS Office Versions

Hallo Vrienden!

This is your goed oud vriend Vipul, back again with a simple yet powerful trick. I thank my friend Jaspreet for this article.

Today, we will learn how to export your MS Outlook file to an USB, your laptop's hard disk or any other secondary storage.

Why you should do this? 
You are continuously on the go, switching between jobs etc. hence, you would always want a backup of all your past history so that you don't have to follow up with your ex-cos teammates for certain mail communication.

So let's get started!

Let's see, I just found a very informative step-by-step process of how this could be done. So, here I would give reference to that article and would request your queries in the comment section below.

Link to the article, please click here [or copy the address in your browser: https://support.office.com/en-us/article/Export-or-backup-email-contacts-and-calendar-to-an-Outlook-pst-file-14252b52-3075-4e9b-be4e-ff9ef1068f91]


Rest is Next!

Proost...
Vipul 

Optimize Laptop Performance: Part 1 Optimize Drives

Hola Amigos,

In this blogpost, I am going to share the easiest method to improve your laptop's disk performance.

Wanna make a guess, well some hints: hard-disk, easiest, performance improvement!

Yes, you got it right, I am talking about disk optimization and defragmentation. (for those who didn't get it correct, it's cool! You are reading this because you wish to learn, right?)

But, before we learn how to do it, let's understand in simple terms what it means:

Fragmentation occurs when your system performs common memory function like creating, modifying or deleting files. So, what happens is that at some point of time, the OS (Operating System) needs to store these files in non-contiguous clusters and this results in improper utilization of disk clusters resulting in fragmentation. There are 2 types of fragmentation:

#1: Internal Fragmentation: Suppose each block of memory is 1024 Kb. Now if the OS allocates a block of this size to a process which requires 900 Kb, then the rest of 124 Kb (=1024-900 Kb) becomes unavailable for usage for other processes. This is internal fragmentation.

As you can see, the white space in the above illustration represents Internal Fragmentation

#2 External Fragmentation: This will be more clear from the figure below.


Now, suppose there is a process which has requested OS for 5 memory block. As you can see the above cluster contains 5 free memory blocks (in white), but the OS will not allocate them because these spaces are not contiguous! This is External Fragmentation.

Now is the time to resolve both these issues using the defragment option. So let's get started.

Step #1: Choose the drive which you want to optimize and then right click -> Properties


Step #2: Navigate to Tools tab and then click on Optimize as shown below


Step #3: Select the drive to defragment, click on either Analyze or Optimize (depending upon what you want to do)


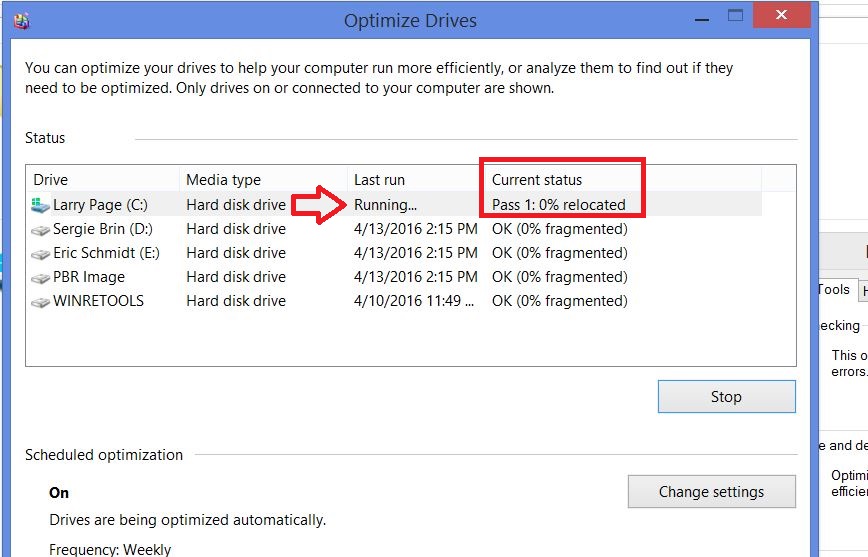
There is actually no Step #4. If you clicked upon Optimize, then you will see the progress as shown below:

That's it! Now do it for all the drives which are fragmented and you surely going to have an improved disk-related operations.

Have any other ideas. Leave it in the comments section below.

Rest is Next!
Vipul

Friday, 5 February 2016

3 Things to Resolve Fan Noise

Hola Amigas!

Let me take a break from my previous article and write 3 things which are useful in resolving the huge decibels of noise your laptop fan makes.

This blog is in response to a query from my blog reader Thejaswi

So, let's get started:

The problem statement goes like this. 
Whenever, she starts using some heavy application like Photoshop. The problem is that speeding up of your laptop. in general indicates, that your laptop is heating! And the relationship between fan speed, fan noise and laptop heating is direct! So, it certainly is not a very good thing.

Now, what can it lead to?
Overheating is one of the leading causes of hard drive failures. Some other issues involves slowness, random reboots etc.

So, let's see how can we solve this problem:

Solution #1: Buy a laptop cooler
The easiest of all. They costs you a little bit but prolongs the life of your laptop a lot. A simple Google search can show you the various options available on the various e-com sites.

So, your laptop sits on top of the cooling pad (which gets power from the USB port). Many of the cooling pads comes with a built-in USB hubs so that you don't run out of USB ports. I agree that they may not be that handy if your work involves frequent travel and for that, I request you to see solution #2.

Solution #2: Kill unnecessary processes
As we have understood that a heavy load on the CPU causes the fan to go bizarre. So, killing of unwanted, non-relevant processes is a natural logical extension to reduce the problem.

One of the best way to do this is to kill the process during the start-up, so that they don't load. You can do this by following the steps mentioned below:

In Win 7:
Press Win + R (shortcut for Run) and type msconfig


It will direct you to this screen: Navigate from General tab to Startup tab


Here, you will see list of all processes. Disable the ones which are unnecessary and then restart your system. 

In Win 8.1
You can directly do it in Task Manager. 

To open Task Manager, press Ctrl+Shift+Esc at single go

and then disable the process it as shown below:
{Some programs which you can disable are: Skype, DropboxOEM, Java Update Scheduler, Sticky Notes}


You can also use specialized software like Soluto. This app has enormous features like Diagnostics, Alarm, Erase, Backup, Anti-virus etc.

Solution #3: Remove the dust
Using your laptop in hostile conditions and on-the-go is what you initially purchased it for, right? But, believe me, as dust is a big problem for you, it is for your laptop as well!

A word of caution: Do not do this if you are not sure what you are doing!

So, having read the disclaimer, let me tell you how you can do that:
Turn your laptop off, remove the battery and find the screws that secure the case. Once you’ve exposed the filthy mess that is your laptop’s inner workings, set about cleaning it with the air

There is video tutorial for this, you can watch it here

Dell has got a wonderful KB article explaining step-by-step how can you do that. To this article, click here
[URL: http://www.dell.com/support/article/us/en/19/530984/en]

With this, I think that using your laptops will be pleasant experience to your ears!

Got queries, post them in the comments sections below.

El descanso es proximo!

Au Revoir :)

Sunday, 13 December 2015

Laptop Display Issues Part-I: Understanding Display Assembly Diagram

Hola Amigas!

I can understand your anger over my not coming up with any article for nearly 6 months now! 

To compensate, in the next two blogs, I am gonna try to help you to understand to troubleshoot one of the most common issues in laptops these days i.e. of Display. [I thank Samiksha for the motivation for this blog!]

But before we deep dive into troubleshooting steps, lets try to understand the architecture of display in a common laptop.

This structure will also help you in bargaining with local laptop repairs mechanics as you can specifically ask them to tell you the issues and correspondingly you can weigh in your monitory options.

So lets rock and roll:

The basic structure of a laptop display is something like this:


As you can see, there are just 4 basic parts. Let's try to understand them in layman's terms:

#1: Video Cable is responsible for: 
      a. Carrying display signals from Motherboard (or video card) at point 1 to LCD screen at point 2
      b. In most cases, it also supplying the necessary voltage to the FL Inverter board at point 3

Video cable typically costs somewhere about INR 500/- in e-com sites

#2: FL Inverter board is responsible for:
      a. Converting low DC received at point 3 to high voltage AC at point 4.
          i. This is then fed to the CCFL (backlight bulb)

If an issue exists at this component, when you turn on the laptop, the LCD screen (backlight bulb) will not light up. Nevertheless, you will be able to see a very dim image on the laptop screen.

This component is gonna cost you around INR 1000-1500 in e-com sites

#3: CCFL (backlight bulb)
When the backlight bulb lights up, you can see an images on the LCD screen. In most cases the backlight bulb is a part of the LCD screen and if it’s bad, the entire screen has to be replaced. By the way, some specialized repair shops can replace the backlight bulb itself.

Buying this is an expensive affair and you may have to shell out more than INR 5k+

#4:Lid close switch:
The lid close switch is a small button that locates close to the display hinges. On some newer models there is no button, because the switch is magnetic. You can set up your laptop to go to a hibernation mode or to a standby mode when the LCD is closed via power management software. These modes are triggered when the display is closed and the lid close switch is pressed down. If the LCD screen on your laptop will not light up when you open the display assembly, check the lid close switch is stuck inside (it might happen because the switch is dirty). 


So, I tried to explain in simple terms about the display set-up of a common laptop. Hope this helps to bargain for prices next time you visit the repair shop.

Got queries, post them in the comments sections below.

El descanso es proximo!

Au Revoir :)


Saturday, 13 June 2015

Find Out Publishing Date Of Any Article

Hi Friends!

Hope you all are doing good. It took some time for me to write here as my schedule had become quite hectic in the last few months.

During my previous endeavours, I had to do a lot of secondary research. But you all know that, if you have to read 60+ articles, easiest way to filter the results while Googling!

But many a times, Google does not show the published date of the articles and because even the article does not have any date mentioned on it, you are uncertain about the age of the article.

So, I share two methods of achieving this:

Method 1:

I thank my friend Shashank for helping me in this. So here it goes:

#1: Suppose, I am searching for pdf on literacy rates, so my original search will be something like:
                                                          informat: pdf literacy rate

[and the address bar will be like this: https://www.google.co.in/search?q=informat%3A+pdf+literacy+rate&oq=informat%3A+pdf+literacy+rate&aqs=chrome..69i57j69i58.18910j0j7&sourceid=chrome&es_sm=93&ie=UTF-8]


Now the trick lies in passing one more parameter in the query string [what ever is after ? in URL is known as query string, its a key-value pair and one of the easiest way to pass values between pages]

So we will add &as_qdr=y15 to the query string and now the query string will look like
[https://www.google.co.in/search?q=informat%3A+pdf+literacy+rate&oq=informat%3A+pdf+literacy+rate&aqs=chrome..69i57j69i58.18910j0j7&sourceid=chrome&es_sm=93&ie=UTF-8&as_qdr=y15]

Method 2:

Open Internet Archive Wayback Machine, [URL: http://archive.org/web/]

Paste the URL in the box and Voila you can track the history of the article since the beginning of time!


Happy Searching!

Regards,
Vipul

If you know any other method, please share it with me on the comments section.

Tuesday, 3 February 2015

Google Little Known Tricks - Part 1

Holla Guys!

Today, I am going to write a small post on how Google's caters to the child inside you!

Trick #1

Here, we will learn to play Atari Breakout on Google images. So let's get started:

#1: Open Google Images. URL: https://images.google.com/

#2: Search Atari Breakout and start playing:


Trick #2

You can rotate your Google search screen 360 degrees like the way you have seen in MS Powerpoint

#1: Search for do a barrel roll on Google and wait and watch!


Trick #3:

To bypass proxy in China where Google was banned, this trick was of utmost importance:

Google when spelled backwards becomes elgooG, But the interesting fact is that you can use http://www.elgoog.im for searches.


Rest is Next.

Cheers!

Wednesday, 28 January 2015

Get Flipkart's Item Details in an Excel File Using jQuery

Hi fellas!

Kak bbl Bce? [pardon my Russian, I just meant to ask, "how are you all?"] :P

Today we are going to replicate some functionality of WebHarvy Web Scrapper. You can get more documentation on this tool at its official website, https://www.webharvy.com/ [wait for my new posts on this!]

So, in today's blog, we will try to retrieve data from Flipkart after making a search for laptop into an excel file using jQuery (a client side scripting language, can read about it at http://jquery.com/ or wait for my new posts).

I recommend Google Chrome for this trick! So let's get started:

#1: Open Google Chrome. Navigate to Flikart.com and then search for laptop and hit enter


#2: Press F12 (in laptops, you may have to press Fn + F12 simultaneously). You will see Web Developer window, either at the bottom or at the right side of the web page.


Click on Console 

#3: Now paste the following code into the "Area for writing jQuery scripts"

var title="";
var price="";
var html="<table><tr><td>Title</td><td>Price</td></tr>";
$('#products .gd-col').each(function(){
title=$(this).find('.pu-title a').text();
price=$(this).find('.pu-price .pu-final span').text();
var tempdetails="<tr><td>"+title+"</td><td>"+price+"</td></tr>";
html=html+tempdetails;
});
html=html+"</table>";
window.open('data:application/vnd.ms-excel,' + encodeURIComponent(html));


and hit Enter. You may receive download exception. In that case, select the radio button which says to allow download from this web-site.

#4: There will be an excel file downloaded to your system. Open it


You may receive format error. Don't worry about that, click Yes


And that's it! You have all the data in an excel format available at your disposal. You can tweak the code to include other options in separate columns in excel.

I have tested the code in Chrome, and not sure about how it behaves in Mozilla or IE. 

Please use the comment section to let me know the result of running this code on other browsers.

El descanso es proximo!

Adios.

Saturday, 3 January 2015

Reset Firefox to its Default State

Hi pals!

I wish you all a very happy new year and welcome you to this exiting world of tips and tricks. May our learning be exponential this year!

We begin this year by learning to reset Mozilla Firefox to its default state.

Now why would you do this?
Possible explanation are to get rid of Extensions and themes, website permissions, user styles and social features, download actions, plugin settings, toolbar customizations etc.
But Firefox saves certain things as well. You can get a complete list from here

So let's get started:

#1: Find the 3 horizontal lines on the Toolbar and follow the steps in screenshot:


#2: Click on Troubleshooting Information


#3: Click on the Reset Firefox button as shown below:


That's it. Once done, you will see Old Firefox Data folder on your systems' desktop


This folder will help you to restore some important old data from your old Firefox. I will talk about it in my later blogs.


Wish you a very happy new year again!

Cheers!
Vipul

Sunday, 14 December 2014

Configure Microsoft Outlook in 5 Steps

Hallo Freunde!

Hoffe sie alle sind gut! [Hope you are all good]

Today, we are going to learn to configure MS Outlook(2010/2013) in 5 simple steps (4 actually). The credit for this article goes to Kavita Yajnik! So lets get started!

#1: Open MS Outlook 2010:


#2: This will direct you to:


Click on Next >

#3: Now click on Yes and then Next  > as shown below:


#4: Enter your mail details as shown:


and then click Next >

#5: And you are Done!!


Click on Finish to complete the process... 

And you can start using Outlook!


Hope this helps!

We will learn to Manually configure server settings (#4 radio button 3) in the next post.

Till then...

Auf wiedersehen!

Wednesday, 3 December 2014

Use Hindi Fonts in MS-Office Suite

Hi Friends!

Sometimes you might have encountered a situation where you receive a file and that file is created in Hindi. But as you do not have Hindi font (Kruti dev to be precise) in your systems, the file will open in some undecipherable manner. In this post, I will try to answer just that (thank you Alka Nehra for asking this question!)

So let's get started:

#1: Download the font from ffonts
[in case you know better sites, please share them in the comment section, please do understand that I am in no way responsible for any wrong which happens to your computer if you use this site!]

#2: Download the font

#3: Press CTRL+R in your keyboard to open the run window, type C:\Windows\Fonts and press OK:


 #4: Copy the font and paste it in the window which opens:


And you are done, now open the file again. This time around, it will make much more sense!

Hope it helps!

Rest Is Next..

Vipul